
Guides
Evitania Online: Engineering System Guide

Full breakdown of Engineering — unlock at level 40+, Input vs Upgrades tabs, four currency tiers, production speed, stat nodes, and a material checklist to min-max your account-wide buffs.
Long-form guide — scroll straight through, or use the index to jump to a section.
Full breakdown of the Engineering system — unlock, core loop, currency production, permanent upgrades, and a practical material checklist. Engineering unlocks at level 40+ in Act I’s main city. Treat it as an account-wide booster: it stacks with gear, talents, and the Smeltery crafting loop rather than replacing them. If you ignore Engineering until late Act II, you leave free passive power on the table.
Overview: Unlock & Core Loop
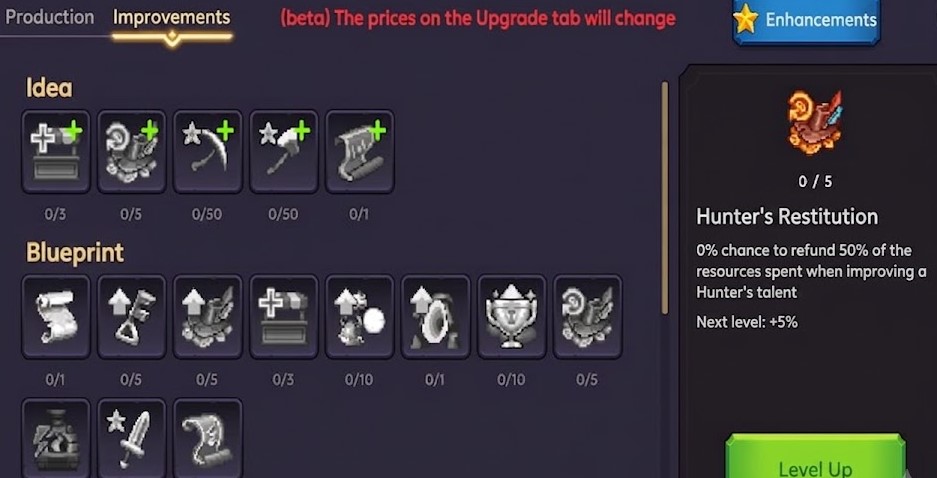
The UI has two tabs: Input and Upgrades.
- Produce Engineering currencies on Input (passive rates shown as X/h).
- Spend those currencies on permanent nodes on Upgrades.
- Unlock the next currency tier, then repeat.
That loop is the whole system. You are not crafting temporary consumables here — you are buying lasting account strength. Plan bags for the physical items Engineering eats, because upgrades pull from inventory, not stash.
Tab 1: Input — Currency Production
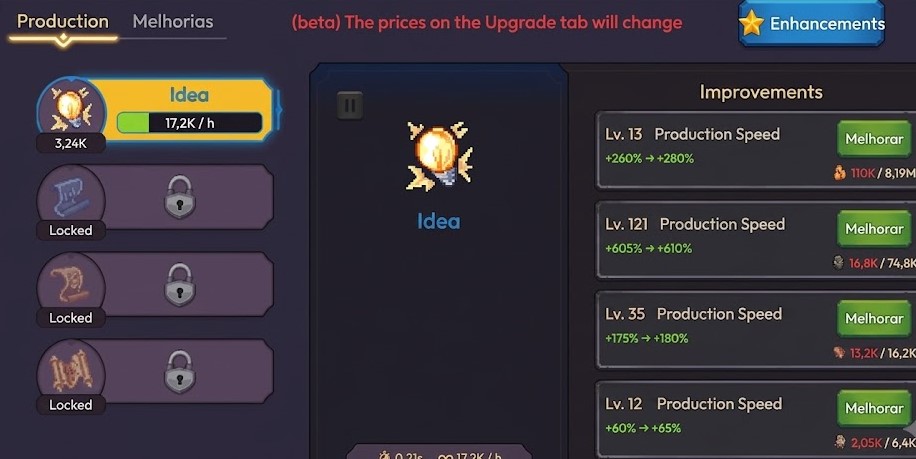
Tab 1 manages passive currency accumulation. There are four currencies. You start with Idea. Under each currency name you see a production rate (X/h). Each currency funds its matching upgrade tier on Tab 2.
Production Speed panels
The Production Speed panel only boosts passive generation for that currency. Leveling these panels consumes physical items from your bag — mostly Act I gathering and mining mats. Empty bags stall Engineering even if you have gold and gems.
Shop multiplier worth buying early
Buy the permanent 4/4 shop upgrade in Act I that 2× all passive Engineering production. It is one of the cleanest early investments for the system: every hour of AFK generation goes further, which shortens every later tier.
Tab 2: Upgrades — Spend & Unlock Next Tier
Spend currencies on permanent character and account-wide stat buffs. Node costs sit in the bottom-right of each node. You cannot unlock the next Input currency “for free” — progress to Blueprint, Prototype, and Masterwork by buying the specific unlock node on the current Upgrades row.
Inventory rule (easy to miss)
Whenever you unlock a new currency, return to Tab 1 and level its Production Speed from scratch. Physical items are consumed during those upgrades. Keep them in your bag — stash will not feed Engineering.
Core Progression Rule: Iterative Upgrading
Use this loop for every tier:
Unlock new currency → raise Production Speed on Tab 1 → spend into Tab 2 upgrades → unlock the next currency.
Skipping Production Speed feels fine for an hour and then feels terrible for a week. Rate first, then spend.
What to Prioritize Early
Exact node order can shift with patches, but these priorities stay useful:
- Production Speed for your current currency before luxury stat nodes.
- Unlock the next currency once the unlock node is affordable — later tiers gate most endgame Engineering value.
- Favor account-wide or long-lived combat/gathering multipliers over niche one-fight stats unless you are mid-boss check.
- Keep a small bag reserve of common mats so you never hard-stop a Production Speed level overnight.
Upgrade Material Checklist
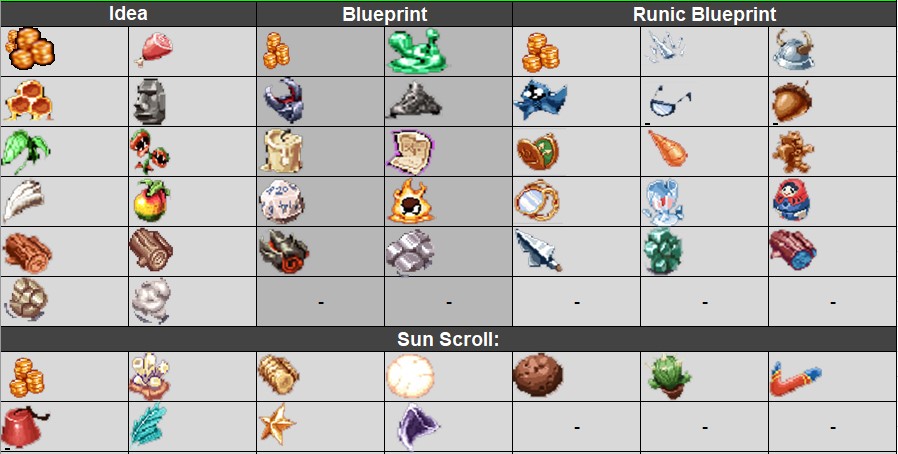
Verified list of item themes used across the four tiers. Stock during normal Act I–III play instead of running dedicated “Engineering only” routes every session. Names below are adapted from icons to standard RPG terms.
| Tier | Currency | Materials to stock |
|---|---|---|
| Tier 1 | Idea | Common Act I crafting mats (Iron Ore, Wood Planks) |
| Tier 2 | Blueprint | Refined mats (Steel Ingots, Treated Lumber) |
| Tier 3 | Prototype | Advanced components (Gears, Circuits) |
| Tier 4 | Masterwork | Rare drops and boss loot (Arcane Cores, Dragon Scales) |
Engineering vs Smeltery vs Forge
Players mix these up constantly:
- Engineering — account progression board with passive currencies and permanent nodes.
- Smeltery — crafting/smelting pipeline (see the Smeltery database).
- Town Forge — local gear/workstation loop in town.
They complement each other. Smeltery and gathering feed the bags Engineering empties. Engineering buffs make those loops faster. Do not wait for “perfect” mats before unlocking Engineering at 40+ — start Idea production early and grow into higher tiers.
Common Mistakes
- Leaving Engineering untouched until Act III, then panic-dumping mats.
- Parking upgrade mats in stash and wondering why buttons do nothing.
- Buying every cheap Tab 2 node before raising Production Speed.
- Skipping the Act I 2× production shop upgrade.
- Treating Masterwork as a day-one goal instead of a multi-tier project.
Practical Session Plan
- Unlock Engineering at 40+ and confirm Idea is generating.
- Buy the Act I shop 2× production upgrade when available.
- Keep a rotating bag stack of Tier 1–2 mats while you clear Act I content.
- Push Blueprint unlock, then rebuild Production Speed for the new currency.
- Repeat for Prototype and Masterwork while you progress acts and bosses.
- Revisit nodes after major patches — costs and effects can shift.
Done consistently, Engineering becomes quiet background power: fewer dead hours, stronger account stats, and less “why is this fight still brick-walling me” once gear and talents are already tuned.
See an error or have something to add? Become a contributor — corrections and additions help grow this project, and we credit helpers on the Contributors page.